Day 28: Putting It All Together
Up to this point, all of the example programs you have seen have been pretty pointless. A program that you release in the Real World should be able to do something useful, whether it’s to balance a chemical equation or provide slack-jawed entertainment. So the focus of this chapter will be to pull together all the knowledge accumulated since Day 1 in the creation of a very simple command-line interpreter (CLI).
This CLI will be low-level: it will among other things let the user directly access the memory and hardware of the calculator. For those of you who have experience with the CalcSys application, this program will be like using CalcSys entirely through the Console function, except that each command will be one character instead of a string (to keep things simple, you understand).
Version 1 — The Beginning
This is the first version of the CLI. Note that you will need to supply
the GetStr and GetChar procedures developed on Day 27.
Start:
    CALL   Clear

Restart:
    LD     HL, Restart
    PUSH   HL
    CALL   GetStr
    CALL   GetChar
    JP     C, ErrCommand
    SUB    'A'
    JP     C, ErrCommand
    CP     'Z'-'A'+1
    JP     NC, ErrCommand
    ADD    A, A
    LD     HL, CmdVectors
    LD     D, 0
    LD     E, A
    ADD    HL, DE
    bcall(_LdHLInd)
    JP     (HL)

Clear:
    bcall(_ClrScrnFull)
    bcall(_HomeUp)
    RET

Quit:
    POP    AF
    JR     Clear

ErrCommand:
    bcall(_NewLine)
    LD     HL, errcmd_text
    bcall(_PutS)
    bcall(_NewLine)
    RET
errcmd_text:
    .DB    "ERR: Command", 0

CmdVectors:
.DW    ErrCommand   ; A -
.DW    ErrCommand   ; B -
.DW    Clear        ; C - Clear screen
.DW    ErrCommand   ; D -
.DW    ErrCommand   ; E -
.DW    ErrCommand   ; F -
.DW    ErrCommand   ; G -
.DW    ErrCommand   ; H -
.DW    ErrCommand   ; I -
.DW    ErrCommand   ; J -
.DW    ErrCommand   ; K -
.DW    ErrCommand   ; L -
.DW    ErrCommand   ; M -
.DW    ErrCommand   ; N -
.DW    ErrCommand   ; O -
.DW    ErrCommand   ; P -
.DW    Quit         ; Q - Quit program
.DW    ErrCommand   ; R -
.DW    ErrCommand   ; S -
.DW    ErrCommand   ; T -
.DW    ErrCommand   ; U -
.DW    ErrCommand   ; V -
.DW    ErrCommand   ; W -
.DW    ErrCommand   ; X -
.DW    ErrCommand   ; Y -
.DW    ErrCommand   ; Z -
The program starts out at the label named, appropriately enough, Start. The procedure Clear is called to clear the screen and reset the cursor. Then the program falls into Restart where the real work begins.
First, the address of Restart is pushed onto the stack so the program can return here. Then a string is input from the user and is parsed character-by-character. If a blank line was entered, the program jumps to an error handler that prints a message describing the problem (in this case, an invalid command). Otherwise the character is processed to see if it is in the range ‘A’ to ‘Z’. If not, there error handler is again processed.
In the case that we have a valid character, it is processed with a
vector table to direct execution to the proper
routine. At this point only the commands C and Q are defined. The rest
just display Err: Command.
Compile and test this program to see that it works properly. Make sure that C clears the screen, Q quits the program, and everything else results in an error.
Version 2 — Hex Dump
We are going to develop this CLI by adding one feature to it at a time, allowing us to easily trace any bugs to the most recently added code. This incremental approach is very good for eliminating bugs early.
The first feature to add will be a command to do a hex dump of memory. This will be the most complicated feature to code, but it is very useful for verifying the results of the other commands we will add. The command line format to do a dump will be:
Haddress1 address2
And the hex dump routine will display the hex values of each byte from
address1 to address2. Now before we start coding the hex dump
routine we need a way to extract the two parameters, and we also need a
way to display 16-bit and 8-bit integers in hex:.
Read_HLDE:
; HL = first parameter
; DE = second parameter
; carry = 1 if there was an error
    CALL   ConvHex16
    RET    C
    EX     DE, HL
    CALL   ConvHex16
    EX     DE, HL
    RET
(The ConvHex16 routine can be found at the end of Day 27. This routine will be used quite a bit.)
OutHex_HL:
    LD     A, H
    CALL   OutHex_A
    LD     A, L
OutHex_A:
    LD     C, A
    RRA
    RRA
    RRA
    RRA
    CALL   _Nibble
    LD     A, C
_Nibble:
    AND    $0F
    OR     $30
    CP     10 | $30
    JR     C, _Digit
    ADD    A, 7
_Digit:
    bcall(_PutC)
    RET
That was the routine to display a number in HL or A as hex.
HexDump:
    bcall(_NewLine)
    CALL   Read_HLDE
    JP     C, ErrArgument
DumpLoopA:
    LD     B, 4
    CALL   OutHex_HL
    LD     A, ':'
    bcall(_PutC)
DumpLoopB:
    LD     A, (HL)
    CALL   OutHex_A
    bcall(_CpHLDE)
    JR     Z, DumpEnd
    INC    HL
    LD     A, ' '
    bcall(_PutC)
    DJNZ   DumpLoopB
    XOR    A
    LD     (CurCol), A
    LD     B, 48
    EI
HaltLoop:
    HALT
    LD     A, $FD
    OUT    (1), A
    IN     A, (1)
    CP     $FE
    CALL   Z, Pause
    BIT    OnInterrupt, (IY + OnFlags)
    JP     NZ, ErrBreak
    DJNZ   HaltLoop
    JR     DumpLoopA
DumpEnd:
    bcall(_NewLine)
    RET
Pause:
    bcall(_RunIndicOn)
Pause_Loop:
    HALT
    LD     A, $FD
    OUT    (1), A
    IN     A, (1)
    CP     $BF
    JR     NZ, Pause_Loop
    bcall(_RunIndicOff)
    RET
So how does this work? First, we try reading the two addresses that have been supplied. If there is a problem, we escape to a new error handler:
ErrCommand:
    bcall(_NewLine)
    LD     HL, errcmd_text
ErrGeneral:
    bcall(_PutS)
    bcall(_NewLine)
    RET
ErrArgument:
    LD     HL, errarg_text
    JR     ErrGeneral
ErrBreak:
    RES    OnInterrupt, (IY + OnFlags)
    LD     HL, errbrk_text
    JR     ErrGeneral

errarg_text:   .DB  "ERR: Argument", 0
errbrk_text:   .DB  "ERR: Break", 0
When we get two valid addresses, we start the hex dump. First we report the current address being dumped. Then we display the hex values of the contents of a few bytes of memory. The small screen only allows us to display four bytes per line, so we put four into B and use a DJNZ loop to impose this limit. The display loop (DumpLoopB) is very simple in concept. The value of the current byte is read into A, and this is written to the screen. HL is now compared with DE (the terminating address) to see if we should stop. If so, we go to the end of the routine. Otherwise HL is incremented and the process continues.
The purpose of HaltLoop is to create a short delay after dumping four
bytes so that the user has a little time to examine the output. But
there’s also something more going on here. The keypad is checked to see
if ENTER is pressed using low-level input (I guess I
could’ve used GetCSC, but I wanted to be fast), and in this case there
is a call to Pause. Pause does nothing except wait for CLEAR to be
pressed. It lets the user temporarily stop the hex dump to examine a
section of interest. Also note that the run indicator is turned on while
the hex dump is paused. The run indicator is generally annoying for
normal program operation but pretty good for letting the user know the
program hasn’t crashed.
In the case where a really large section of memory is specified to be
dumped, there is a way to abort by pressing the ON key. That’s what
the check for the OnInterrupt flag is there for. By the way, if you want
to avoid seeing the ERR:BREAK message when you exit the program, reset
this flag in the Quit procedure.
Compile and test this program to see that the hex dump works (don’t forget to add a definition to CmdVectors). Play around with bad inputs, breaks, pausing, etc. Here’re some screen shots:
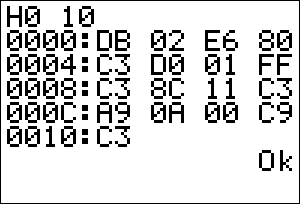
Notice that in the screenshot on the left a message was displayed to indicate successful completion of the command. See if you can figure out how to add that in ;-).
Version 3 — Read/Write
In this next version we will add two functions. Read (command
Raddress) will display the value at a specified address, and is way
too simple to justify including the source here. Write (command
Waddress value) on the other hand, isn’t as easy as you’d expect
because of this little thing called Flash. The calculator would be
severely displeased if someone tried to overwrite the operating system,
so we need to check the address to make sure it references RAM. This is
actually quite easy to do when you know that the binary values of Flash
ROM addresses are all in the range %00000000 00000000 ($0000) to %01111111
11111111 ($7FFF). Oooooh, look at that! Every address in Flash ROM has a reset
fifteenth bit. That means only a BIT instruction is necessary to trap an
error.
Write:
    CALL   Read_HLDE
    JP     C, ErrArgument
    BIT    7, H
    JP     Z, ErrFlash
    LD     (HL), E        ; Since we only want a one-byte value
    bcall(_NewLine)
    RET

ErrFlash:
    bcall(_NewLine)
    LD     HL, errfls_text
    JR     ErrGeneral

errfls_text: .DB    "ERR: Flash", 0
Version 4 — Load and Zero
How about a command to fill a block of memory with the same value?
Sounds good to me, so here comes Load (Laddress1 address2 value). The
first problem we have is that L requires three parameters, so we
require another number extraction routine. We can build off the existing
Read_HLDE routine:
Read_HLDEBC:
; HL = first parameter
; DE = second parameter
; BC = third parameter
; carry = 1 if there was an error
    CALL   Read_HLDE        ; Get first two parameters
    RET    C
    PUSH   HL
    CALL   ConvHex16
    LD     B, H
    LD     C, L
    POP    HL
    RET    C
And the Load function itself is quite simple to synthesize. After all, it’s mostly the theory from the previous versions.
Load:
    CALL   Read_HLDEBC
    JP     C, ErrArgument
LoadLoop:
    BIT    7, H
    JP     Z, ErrFlash
    LD     (HL), C
    bcall(_CpHLDE)
    RET    Z
    INC    HL
    JR     LoadLoop
The Zero command (Zaddress1 address2) is just a special case of the
Load command where the loaded value is zero. All that is necessary is to
set up the registers and jump into LoadLoop.
Zero:
    CALL   Read_HLDE
    JP     C, ErrArgument
    LD     C, 0
    JP     LoadLoop
Version 5 — Enter
Okay, we have a command to store a value to a particular byte, we have a command to store a single value to a range of bytes, now all we need is a command to get a list of values and store them to consecutive memory locations. That, in a nutshell, is what the Enter command does. Enter is invoked with a single parameter, the address where entering begins. Then we input a string of byte values, write those values, and repeat. The condition for termination is when an invalid hexit is encountered (or we go into ROM). Here is the code:
Enter:
    CALL   ConvHex16
    JP     C, ErrArgument
    BIT    7, H          ; This looks redundant, but in practise it is
    JP     C, ErrFlash    ; certainly better than the alternative: let the user
    EX     DE, HL         ; type in a long string and be greeted by an error

Enter_LoopA:
    PUSH   DE
    bcall(_NewLine)
    CALL   GetStr
    POP    DE
Enter_LoopB:
    BIT    7, D
    JP     Z, ErrFlash
    LD     HL, (buf_ptr)  ; This is to check if the buffer is empty
    LD     A, (HL)
    OR     A
    JR     Z, Enter_LoopA
    CALL   ConvHex16
    RET    C
    LD     A, L
    LD     (DE), A
    INC    DE
    JR     Enter_LoopB
Just in case you were wondering, the comments are getting pretty sparse. Well, what did you expect? It’s the last freaking day! You’re not supposed to need explanations :-).
Version 6 — Hexadecimal Arithmetic
What kind of program would this be if we didn’t have any hex math, hmm? We’ll make four commands:
Aaugend16 addend16- Calculates the 24-bit sum of two 16-bit numbers.
Sminuend16 subtrahend16- Calculates the 16-bit difference of two 16-bit numbers.
Mmultiplicand16 multiplier16- Calculates the 32-bit product of two 16-bit numbers.
Ddividend16 divisor16- Calculates the 16-bit quotient and 16-bit remainder of two 16-bit numbers.
After reading Day 15, you should have no problem creating
the necessary routines. N.B. When you are making the division code, you
need to check for a division by zero, and the output should be formatted
as quotient:remainder.
ErrDiv:
    LD     HL, errdiv_text
    JR     ErrGeneral

errdiv_text:   .DB  "ERR: Div by 0", 0
Version 7 — Pointless Other Crap
Okay, this will be the last addition to the CLI. There are going to be three new features: Find, Transfer, and Output. Find and Transfer can be built from the string instructions.
The Find command searches within a specified block of memory for the first occurrence of a given byte. It is invoked as:
   Faddress1 address2 value

Find:
    CALL     Read_HLDEBC
    JP     C, ErrArgument
    LD     A, C
    EX     DE, HL
    SBC    HL, DE
    LD     B, H
    LD     C, L
    INC    BC
    EX     DE, HL
    CPIR
    DEC    HL
    PUSH   HL
    bcall(_NewLine)
    POP    HL
    JP     Z, OutHex_HL
    LD     HL, find_text
    JP     ErrGeneral

find_text:     .DB  "Not found", 0
The Transfer command will copy a block of memory to another location. It is invoked as:
Tsource destination size
We need to make Transfer smart enough to know in which direction to move the data.
Transfer:
    CALL   Read_HLDEBC
    JP     C, ErrArgument

    ADD    HL, BC
    bcall(_CpHLDE)
    JR     C, Forward
    EX     DE, HL
    ADD    HL, BC
    EX     DE, HL
    DEC    HL
    DEC    DE
Transfer_Loop1:
    BIT    7, D
    JP     Z, ErrFlash
    LDD
    RET    PO
    JR     Transfer_Loop1
Forward:
    OR     A
    SBC    HL, BC
Transfer_Loop2:
    BIT    7, D
    JP     Z, ErrFlash
    LDI
    RET    PO
    JR     Transfer_Loop2
Output should output a byte to a specified port (because it’s always nice to have one more way to crash the calculator :-).
Oport value
And that’s the program. I’m sure that there’s a few commands you can think of to add. Some suggestions are
B[oolean]- Calculates the AND, OR, and XOR of two 16-bit numbers
J[ump]- JPs or CALLs an address (useful for easter eggs ;-).
V[ariable]- Given the name of a program, returns the data and symbol table location.
Conclusion
I think I hear a fat lady singing… oh well! I hope you had fun these past few weeks, I know I did (really, hand-coding HTML is rollicksome good fun :-)1. I wish you the best of luck on the rest of your Z80 experience. What, you didn’t know you weren’t finished? Gee, is that the time…
-
This is a lie, and precisely why this tutorial’s markup is now (mostly) generated automatically. ↩︎